
Are you a content creator or business owner looking for a reliable and cost-effective way to host your videos online?
There is no need to search any further when it comes to the Amazon S3 WP Plugin.
You can use this powerful tool to store and manage your video files on Amazon’s secure and scalable cloud storage service.
In this tutorial, we will show you how to set up your own video hosting using the Amazon S3 WP Plugin.
Learn how to integrate videos into your WordPress website and make them load faster for a better user experience.
This tutorial will help you make the most of Amazon S3 WP Plugin. It is suitable for both beginners and experienced users.
By following this tutorial, you can create a professional and efficient video hosting solution for your online presence.
So let’s dive in and discover the endless possibilities of hosting your own videos with Amazon S3 WP Plugin.
To begin setting up your own video hosting using the Amazon S3 WP Plugin, follow these step-by-step instructions.
First, login to your WordPress dashboard and navigate to the “Plugins” section. Click on “Add New” and search for the Amazon S3 WP Plugin.
Once you find it, click on “Install Now” and then activate the plugin. This powerful WordPress plugin integrates seamlessly with AWS, allowing you to easily host and manage your videos.
Activating the plugin is a crucial step in unlocking the full potential of video hosting on your WordPress website.
Use the Amazon S3 WP Plugin to have complete control over your video content. This plugin guarantees fast loading speeds and reliable delivery to your audience.
To use the Amazon S3 WP Plugin for video hosting on your WordPress site, you need to create an Amazon S3 account.
Amazon Web Services (AWS) offers a reliable and scalable platform for hosting your video files. By following this step-by-step guide, you can easily create your own Amazon S3 account.
First, visit the AWS website and click on “Create an AWS Account” to begin the signup process.
Please enter your email address and password, and select the account type that best fits your needs.
Please provide your email address and password, and select the account type that best suits your needs.
After creating your account, configure settings and permissions in AWS for a secure integration with the Amazon S3 WP Plugin.
With an Amazon S3 account, you can fully utilize video hosting and easily deliver high-quality content to your audience.
After creating your Amazon S3 account and integrating it with the Amazon S3 WP Plugin, make sure to configure the settings for an optimized video hosting experience.
Start by accessing the AWS Management Console and navigating to the Amazon S3 service. Here, you will find a list of your buckets, which are containers for storing your video files.
To configure the settings for a specific bucket, select it from the list.
In the bucket settings, you can customize different aspects like enabling versioning to track file revisions and enabling server access logging for better security and monitoring.
You can use CORS rules to control which domains can access your video files.
This ensures seamless playback on your WordPress website without any cross-origin issues. Configure these settings carefully to provide a smooth and secure video hosting experience for your audience.
Learn how to maximize the use of the Amazon S3 WP Plugin and Amazon Web Services on your WordPress site.
To upload videos to your S3 bucket using the Amazon S3 WP Plugin, follow these steps.
Firstly, ensure that the plugin is installed and activated on your WordPress website. Next, navigate to the media library in your WordPress dashboard.
Click on the “Add New” button and select the video file you wish to upload.
Once the upload is complete, click on the “Edit” button for the uploaded video. In the sidebar, you will find the option to set the storage location for the video.
Choose your S3 bucket from the dropdown menu. Finally, click on the “Save” button to save the changes. Your video will now be securely stored in your S3 bucket, ready to be streamed or embedded on your website.
You can easily create a video hosting platform by using the Amazon S3 WP Plugin and the reliable infrastructure of Amazon Web Services.
To secure your videos on Amazon S3 with the Amazon S3 WP Plugin, you must set permissions for each video file.
By assigning permissions, you can control who can view, download, or modify your videos.
To do this, navigate to your S3 bucket in the Amazon S3 console. Locate the video file you want to set permissions for and select it.
In the file’s properties, click on the “Permissions” tab. Here, you can define the access control list (ACL) for the video.
You can choose to make the video public for everyone to see or limit access to certain users or groups.
Additionally, you can set permissions for different actions, such as read, write, or delete, depending on your requirements.
Save the changes after configuring the permissions. Your videos will then have the designated access restrictions.
The Amazon S3 WP Plugin gives you flexibility and control over permissions.
This allows you to protect your videos’ privacy and security, while providing a great viewing experience for your audience.
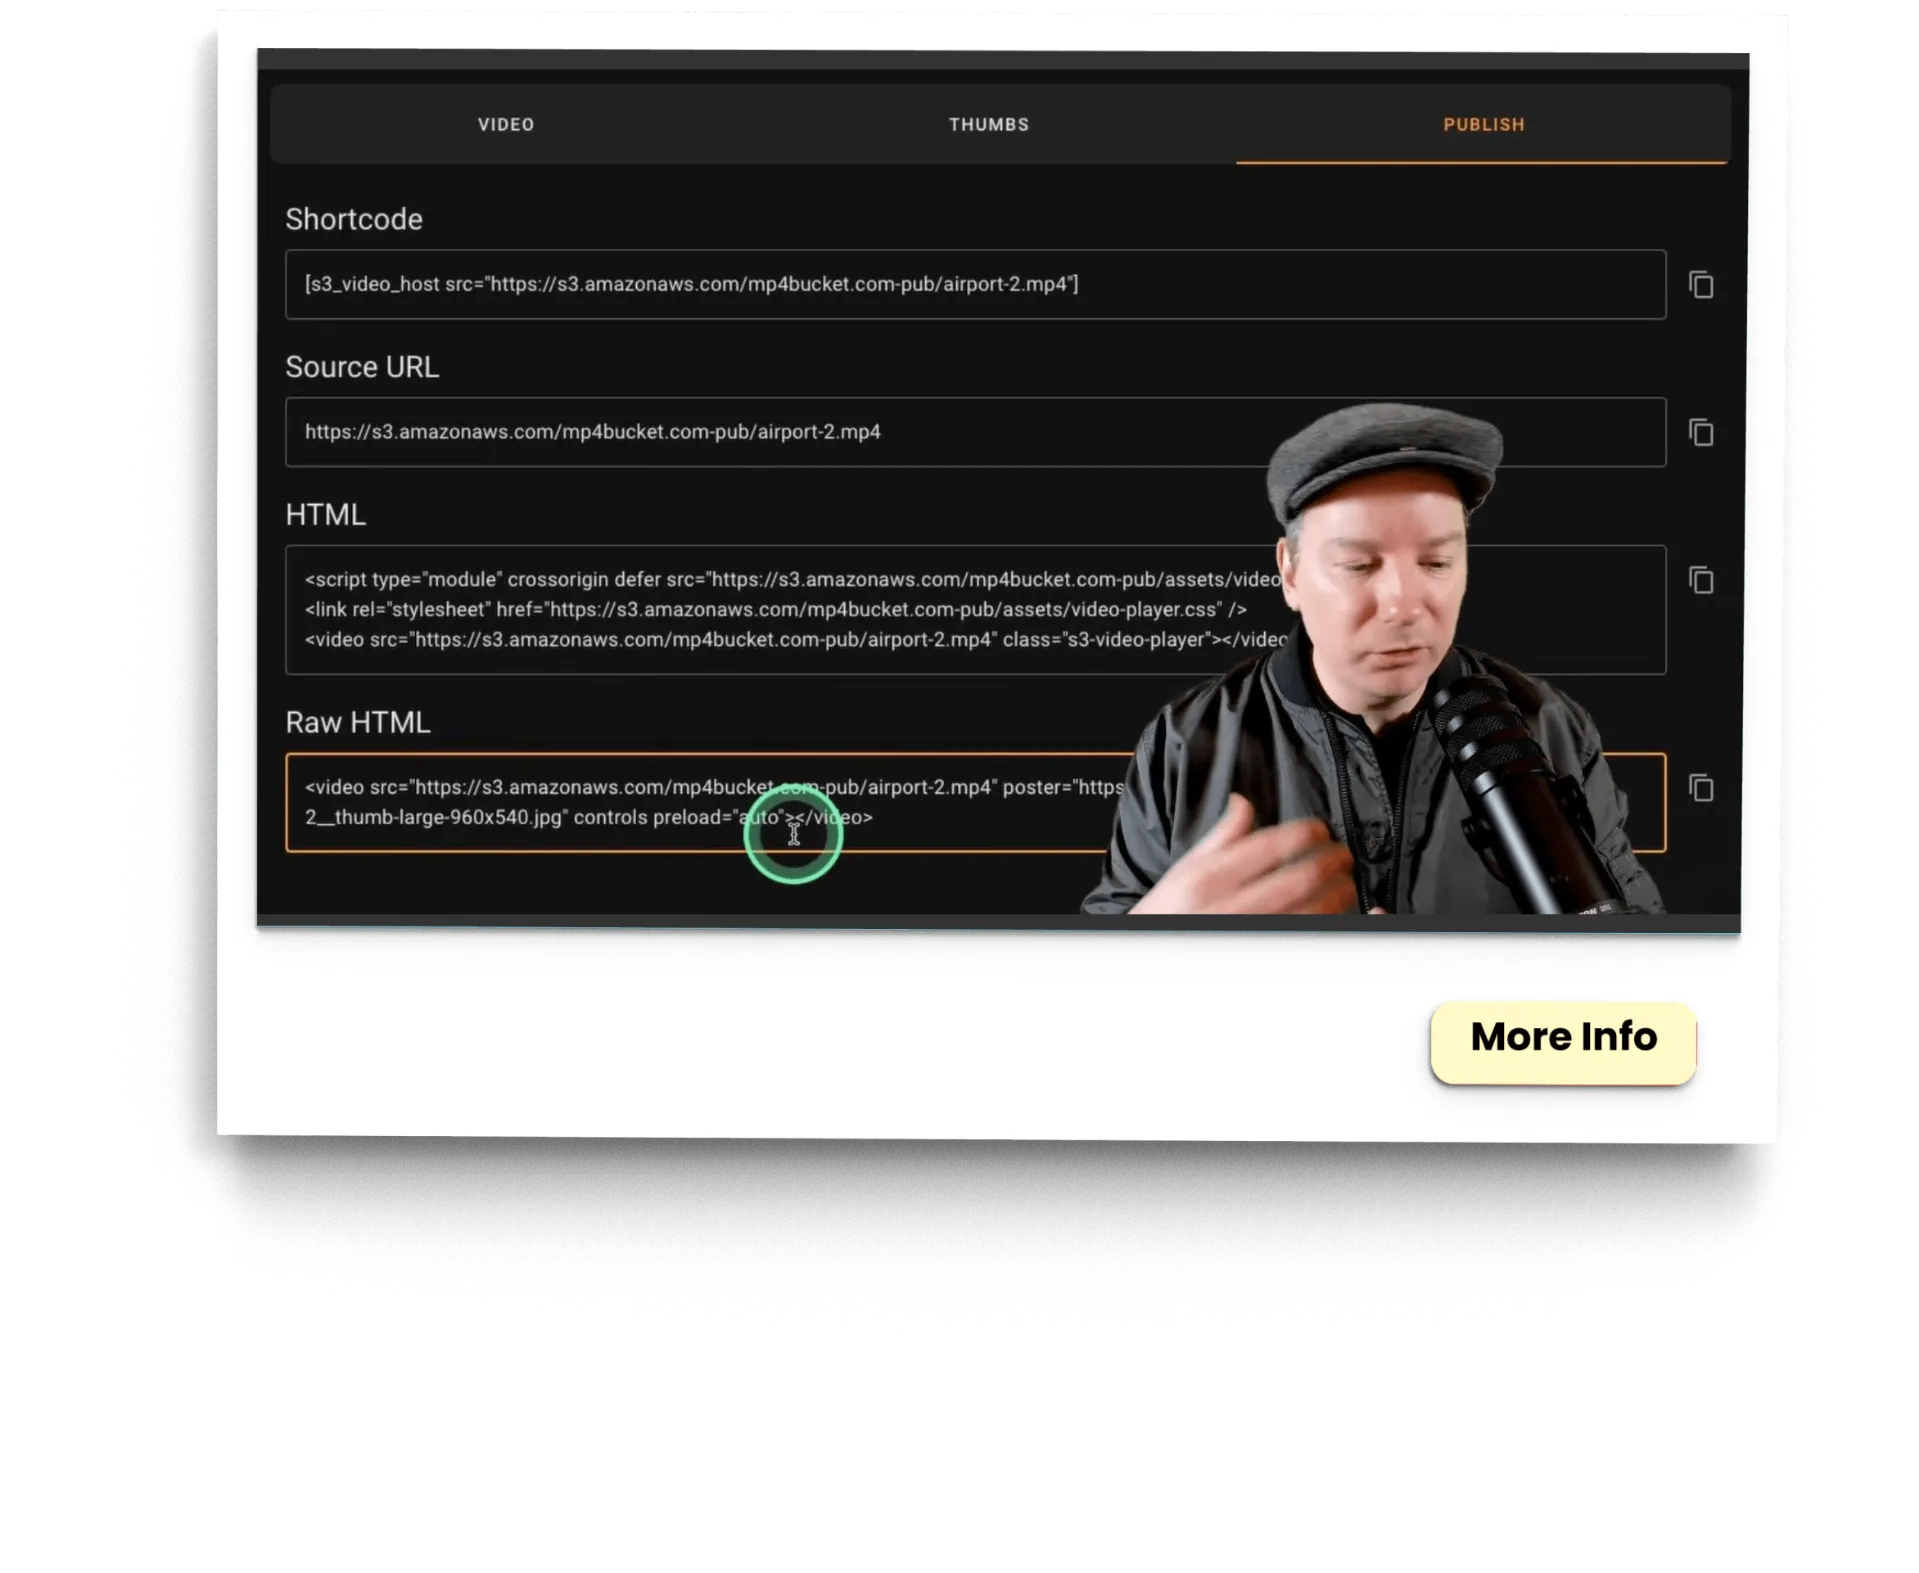
To enhance the user experience of your website or application, you can create a media player using the Amazon S3 WP Plugin. This powerful WordPress plugin allows you to seamlessly integrate Amazon Web Services (AWS) video hosting capabilities into your platform. With this step-by-step guide, you can easily set up a media player that enables smooth playback of your hosted videos. By utilizing the features of the Amazon S3 WP Plugin, you have the ability to customize the player’s appearance, control playback options, and ensure optimal performance. Whether you are streaming educational content, showcasing product demos, or sharing entertainment videos, this tutorial will walk you through the process of creating a media player that perfectly fits your needs. Embrace the possibilities of the Amazon S3 WP Plugin and elevate your video hosting experience to new heights.
With the comprehensive capabilities of the Amazon S3 WP Plugin, you can effortlessly embed a media player in your WordPress site. This intuitive plugin provides a seamless integration of Amazon Web Services (AWS) video hosting, allowing you to display your videos with ease. By following this step-by-step guide, you will unlock the potential to enhance your website or application with a fully customized and responsive media player. With the ability to control playback options, customize the player’s appearance, and ensure optimal performance, you can create a captivating user experience that leaves a lasting impression. Embrace the power of the Amazon S3 WP Plugin and effortlessly embed a media player into your WordPress site today.
To further enhance the security of your videos, the Amazon S3 WP Plugin offers the option to protect them with passwords. This added layer of protection ensures that only authorized users can access your valuable content. By implementing this feature, you have full control over who can view your videos, granting exclusive access to select individuals or groups. With just a few simple steps outlined in this step-by-step tutorial, you can easily set up password protection for your videos, providing peace of mind knowing that your content is safeguarded. Keep your videos secure and maintain control over your valuable assets with the powerful and user-friendly Amazon S3 WP Plugin.
Once you have successfully set up your video hosting using the Amazon S3 WP Plugin, it is essential to monitor video analytics to gain valuable insights into the performance and engagement of your content. With the Amazon Web Services Video Hosting capabilities and the built-in features of the WordPress Plugin for Amazon S3, you have access to a comprehensive array of analytics tools. This includes tracking the number of views, duration of views, and engagement metrics such as likes, comments, and shares. By utilizing this data, you can make informed decisions to optimize your video content strategy, understand your audience better, and identify areas for improvement. The step-by-step guide provided in this tutorial will walk you through the process of accessing and interpreting these analytics, empowering you to make data-driven decisions and maximize the effectiveness of your video hosting with Amazon S3 WP Plugin.
With the Amazon S3 WP Plugin and its seamless integration with Amazon Web Services, you can enjoy reliable video hosting for your WordPress website. This powerful combination offers a secure and scalable solution for storing and delivering your video content to viewers around the world. Whether you are a professional blogger, an e-commerce business, or a creative professional, having a reliable video hosting platform is crucial for providing a smooth and uninterrupted viewing experience to your audience. By utilizing the Amazon S3 WP Plugin, you can effortlessly upload, manage, and embed your videos directly within your WordPress site, ensuring fast loading times and high-quality playback. Say goodbye to buffering issues and slow loading speeds, and provide your viewers with a seamless video experience that keeps them engaged and coming back for more. With this step-by-step tutorial, you will have all the guidance you need to set up your own reliable video hosting platform using the Amazon S3 WP Plugin, empowering you to deliver your content effectively and efficiently.
In conclusion, by following this step-by-step tutorial, you now have the tools and knowledge to successfully set up your own video hosting using the Amazon S3 WP plugin. With this powerful tool, you can easily manage and share your videos on your own website, giving you more control and customization options. Remember to regularly monitor your storage and bandwidth usage to avoid any unexpected costs. With this professional and secure hosting solution, you can elevate the video content on your website and provide a seamless viewing experience for your audience. So why wait? Start utilizing the Amazon S3 WP plugin today and take your video hosting to the next level.
The purpose of using the Amazon S3 WP Plugin for video hosting on your own website is to ensure reliable and scalable storage for your videos. With the plugin, you can easily upload and manage your videos on Amazon S3, a highly secure and durable cloud storage service. This allows you to offload the storage and delivery of your videos to Amazon’s powerful infrastructure, freeing up your website’s resources. Additionally, the plugin provides features like automatic video transcoding and streaming, making it easier for your website visitors to view your videos seamlessly across different devices and internet speeds.
To install and activate the Amazon S3 WP Plugin on your WordPress site, first, go to the WordPress dashboard. Then, click on “Plugins” and select “Add New.” In the search bar, type “Amazon S3 WP Plugin” and click “Search Plugins.” Once you find the plugin, click “Install Now” and then “Activate” to activate it. After activation, go to the plugin settings page and enter your Amazon S3 access key, secret key, and bucket name. Save the settings, and you’re all set to start using the Amazon S3 WP Plugin for storing and managing your WordPress site’s files on Amazon S3.
First, you need to log in to your Amazon Web Services (AWS) account. Then, navigate to the S3 service. Next, click on “Create bucket” and provide a unique name for your bucket. Choose the region for your bucket’s storage. After that, set the permissions for your bucket, deciding who can access it and what they can do. Now, enable versioning if necessary, which allows you to keep track of different versions of your videos. Finally, configure the logging options if desired, and click on “Create bucket.” You are now ready to upload your videos and start hosting them on Amazon S3.
To configure the Amazon S3 WP Plugin to integrate with your video hosting bucket, you first need to install the plugin on your WordPress site. Once installed, go to the plugin settings and enter your Amazon S3 access key and secret key. Then, specify the name of your video hosting bucket and region. You can also set the desired permissions for your videos. After saving the settings, you can start uploading your videos to your WordPress media library, and the plugin will automatically sync them with your Amazon S3 video hosting bucket.
Sure, I can help you with that! First, you need to install the Amazon S3 WP Plugin on your WordPress website. Once installed, go to the plugin settings and enter your Amazon S3 credentials. Next, create a bucket in your Amazon S3 account and configure the plugin to connect to that bucket. After that, you can start uploading videos by going to your WordPress media library and selecting the “Amazon S3” tab. Click on the “Upload” button and choose the video file you want to upload. Once uploaded, you can display the video by using the provided shortcode or by embedding it in a post or page.